Funny Im With You Always Gifs
You know those cute little stickers you can use with your photos and videos in Instagram stories? Today you're going to learn to create 4 GIFs! You don't need to be an artist to make these fun animations. Some knowledge of Procreate is helpful for this project, but I'll talk you through every step. If you've never created an animation in Procreate, you'll be surprised by how fun and easy the process is. You'll be able to use the techniques you learn here to create more animations in Procreate in the future. And if you want to dive in deeper, check out the Skillshare class on the same topic. Let's get started!
If you're new to Procreate, you might not know how many different gestures are available. They can make your process really smooth, not to mention quick!
Supplies
- iPad
- Stylus: I use the Apple Pencil 2
- Procreate
What we're going to create today...

What's a GIF/Animation/Sticker?
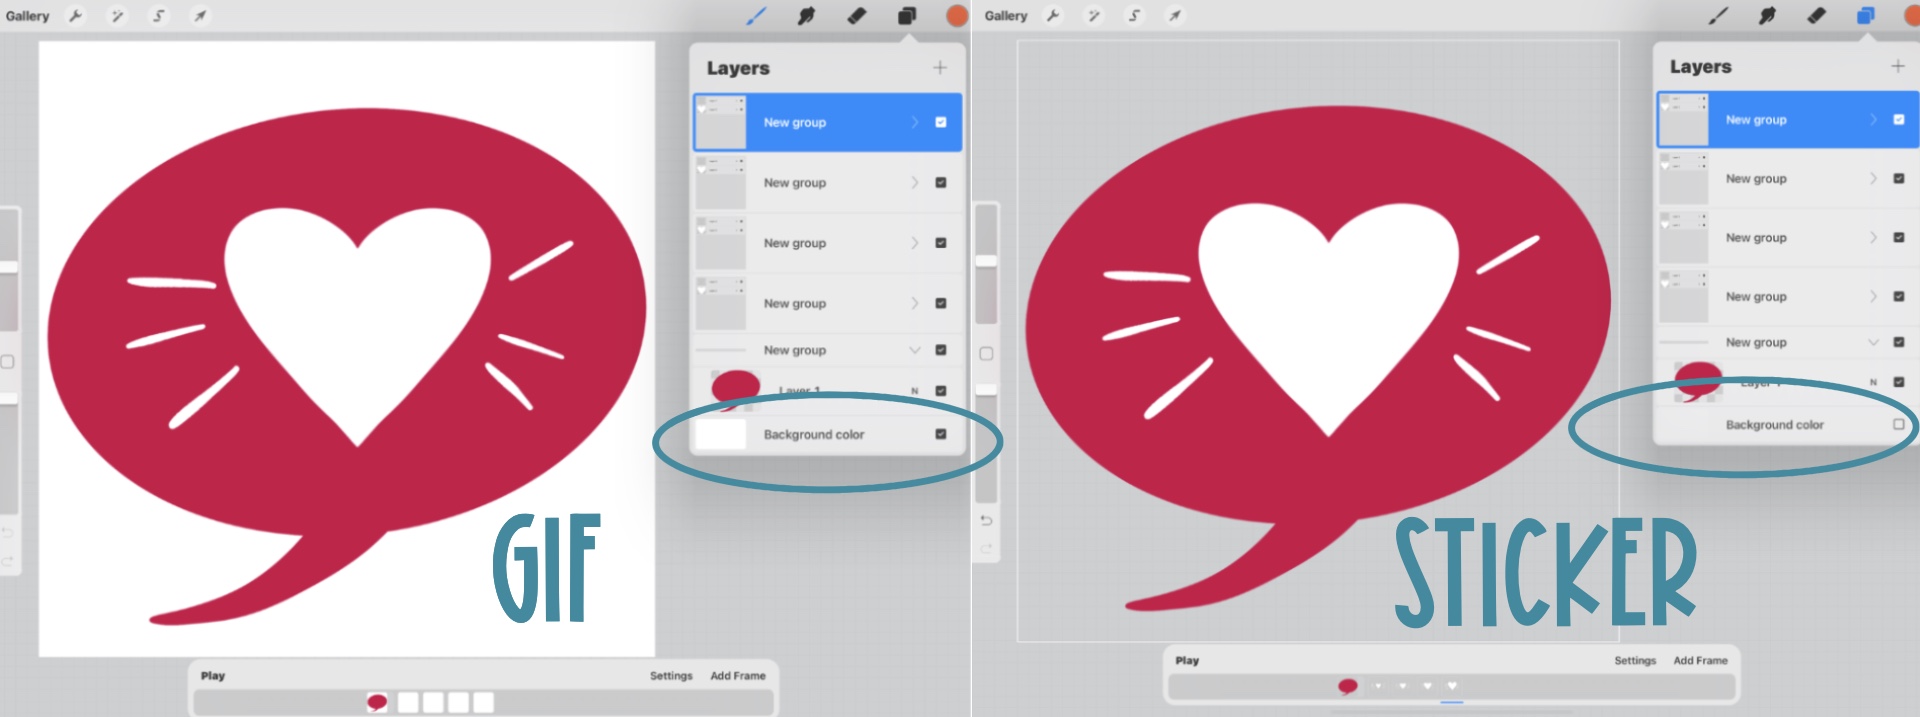
I use the phrases GIF and animation interchangeably. They both mean files of moving images.
- GIFs will loop endlessly, playing over and over again.
- A sticker is a GIF or animation with a transparent background, like those that you use in Instagram stories.
Here's an example of a beating heart sticker on a photo of my dog, Murphy:

To achieve a transparent background, simply uncheck the background color in Procreate. All animations can be GIFs or animated stickers simply by toggling the background on and off. It's really easy!
So, let's get started!
If you rather watch the tutorial, check out the video below!
Creating Your Canvases
Step 1: Create 3 New Canvases
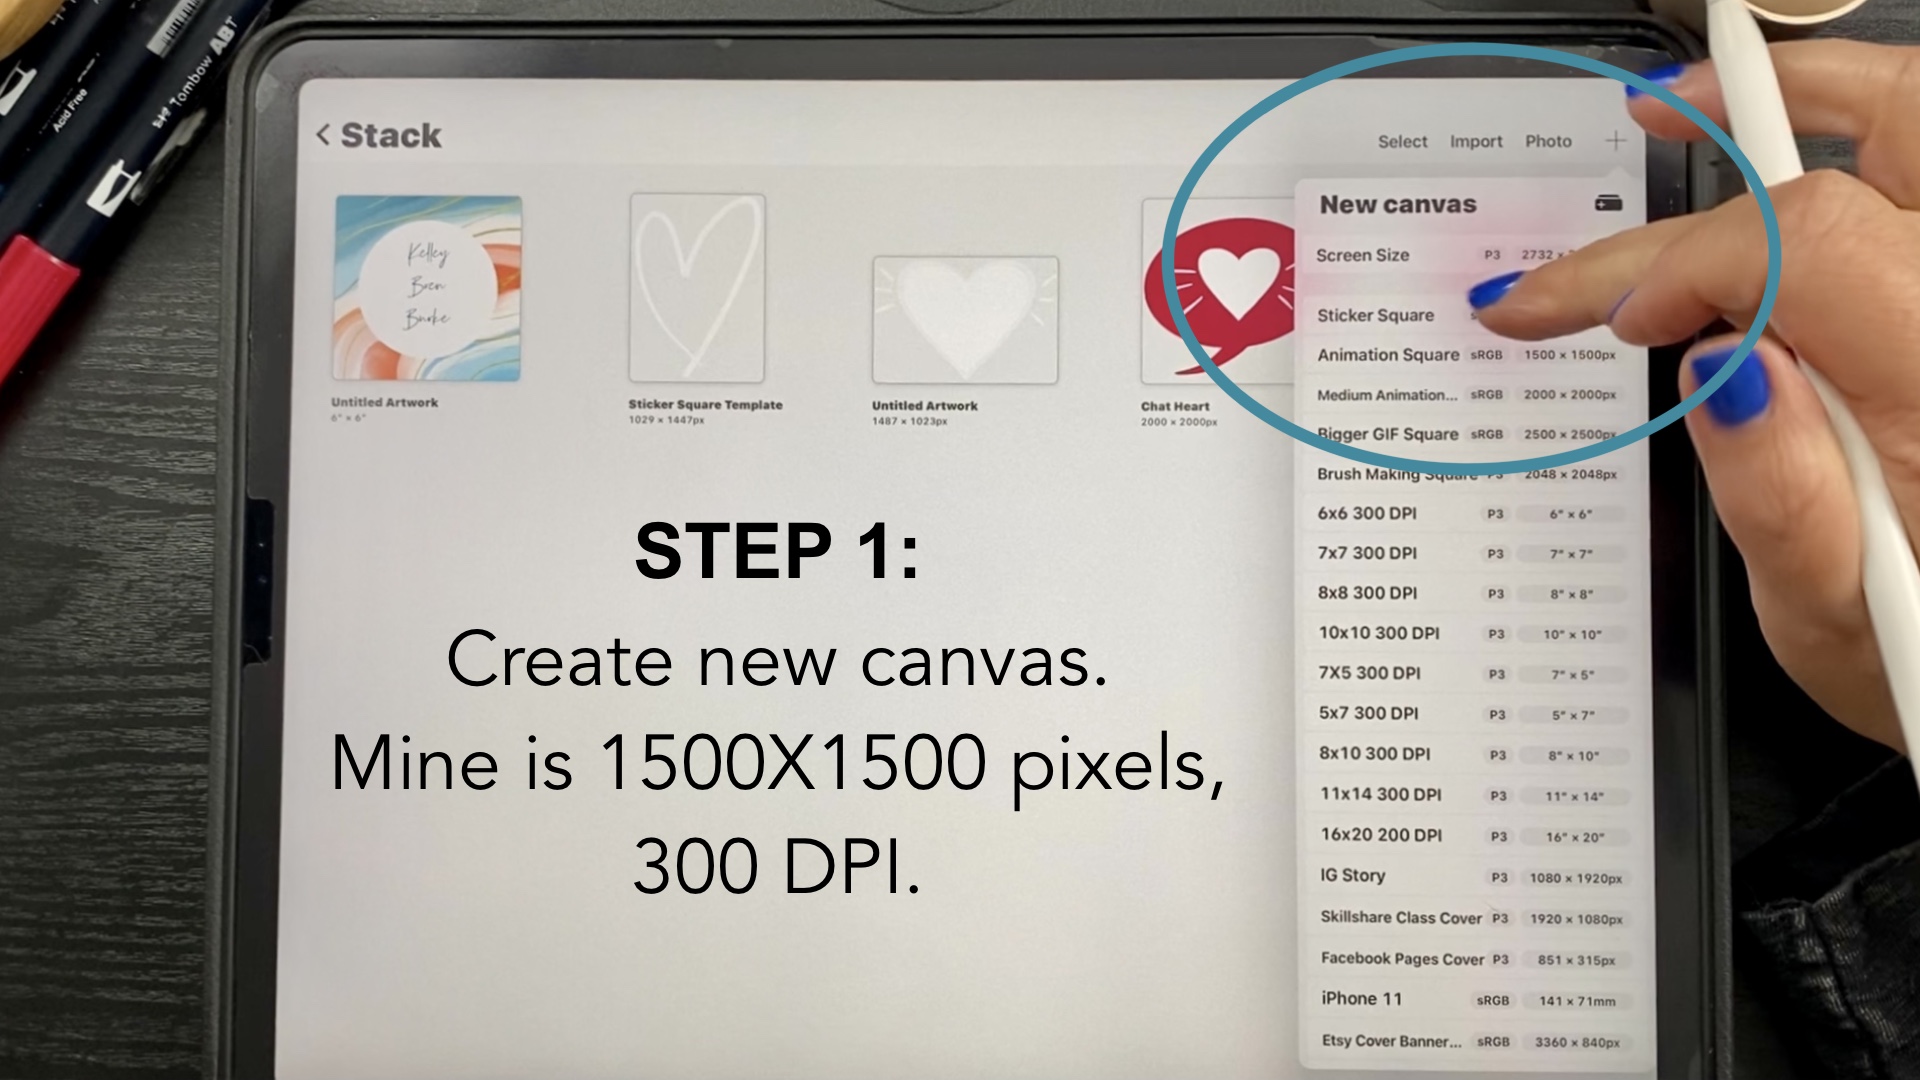
My canvas is 1500x1500 pixels, 300 DPI. We'll need only three of these (even though we're making four animations today) because one of the GIFs we're going to be creating is a duplicate of another but with a little something extra. So, less work for you!
Step 2: Turn on Animation Assist
You can do that by going to the Wrench > Canvas > toggle Animation Assist on and you will see a new bar at the bottom with the animation settings.
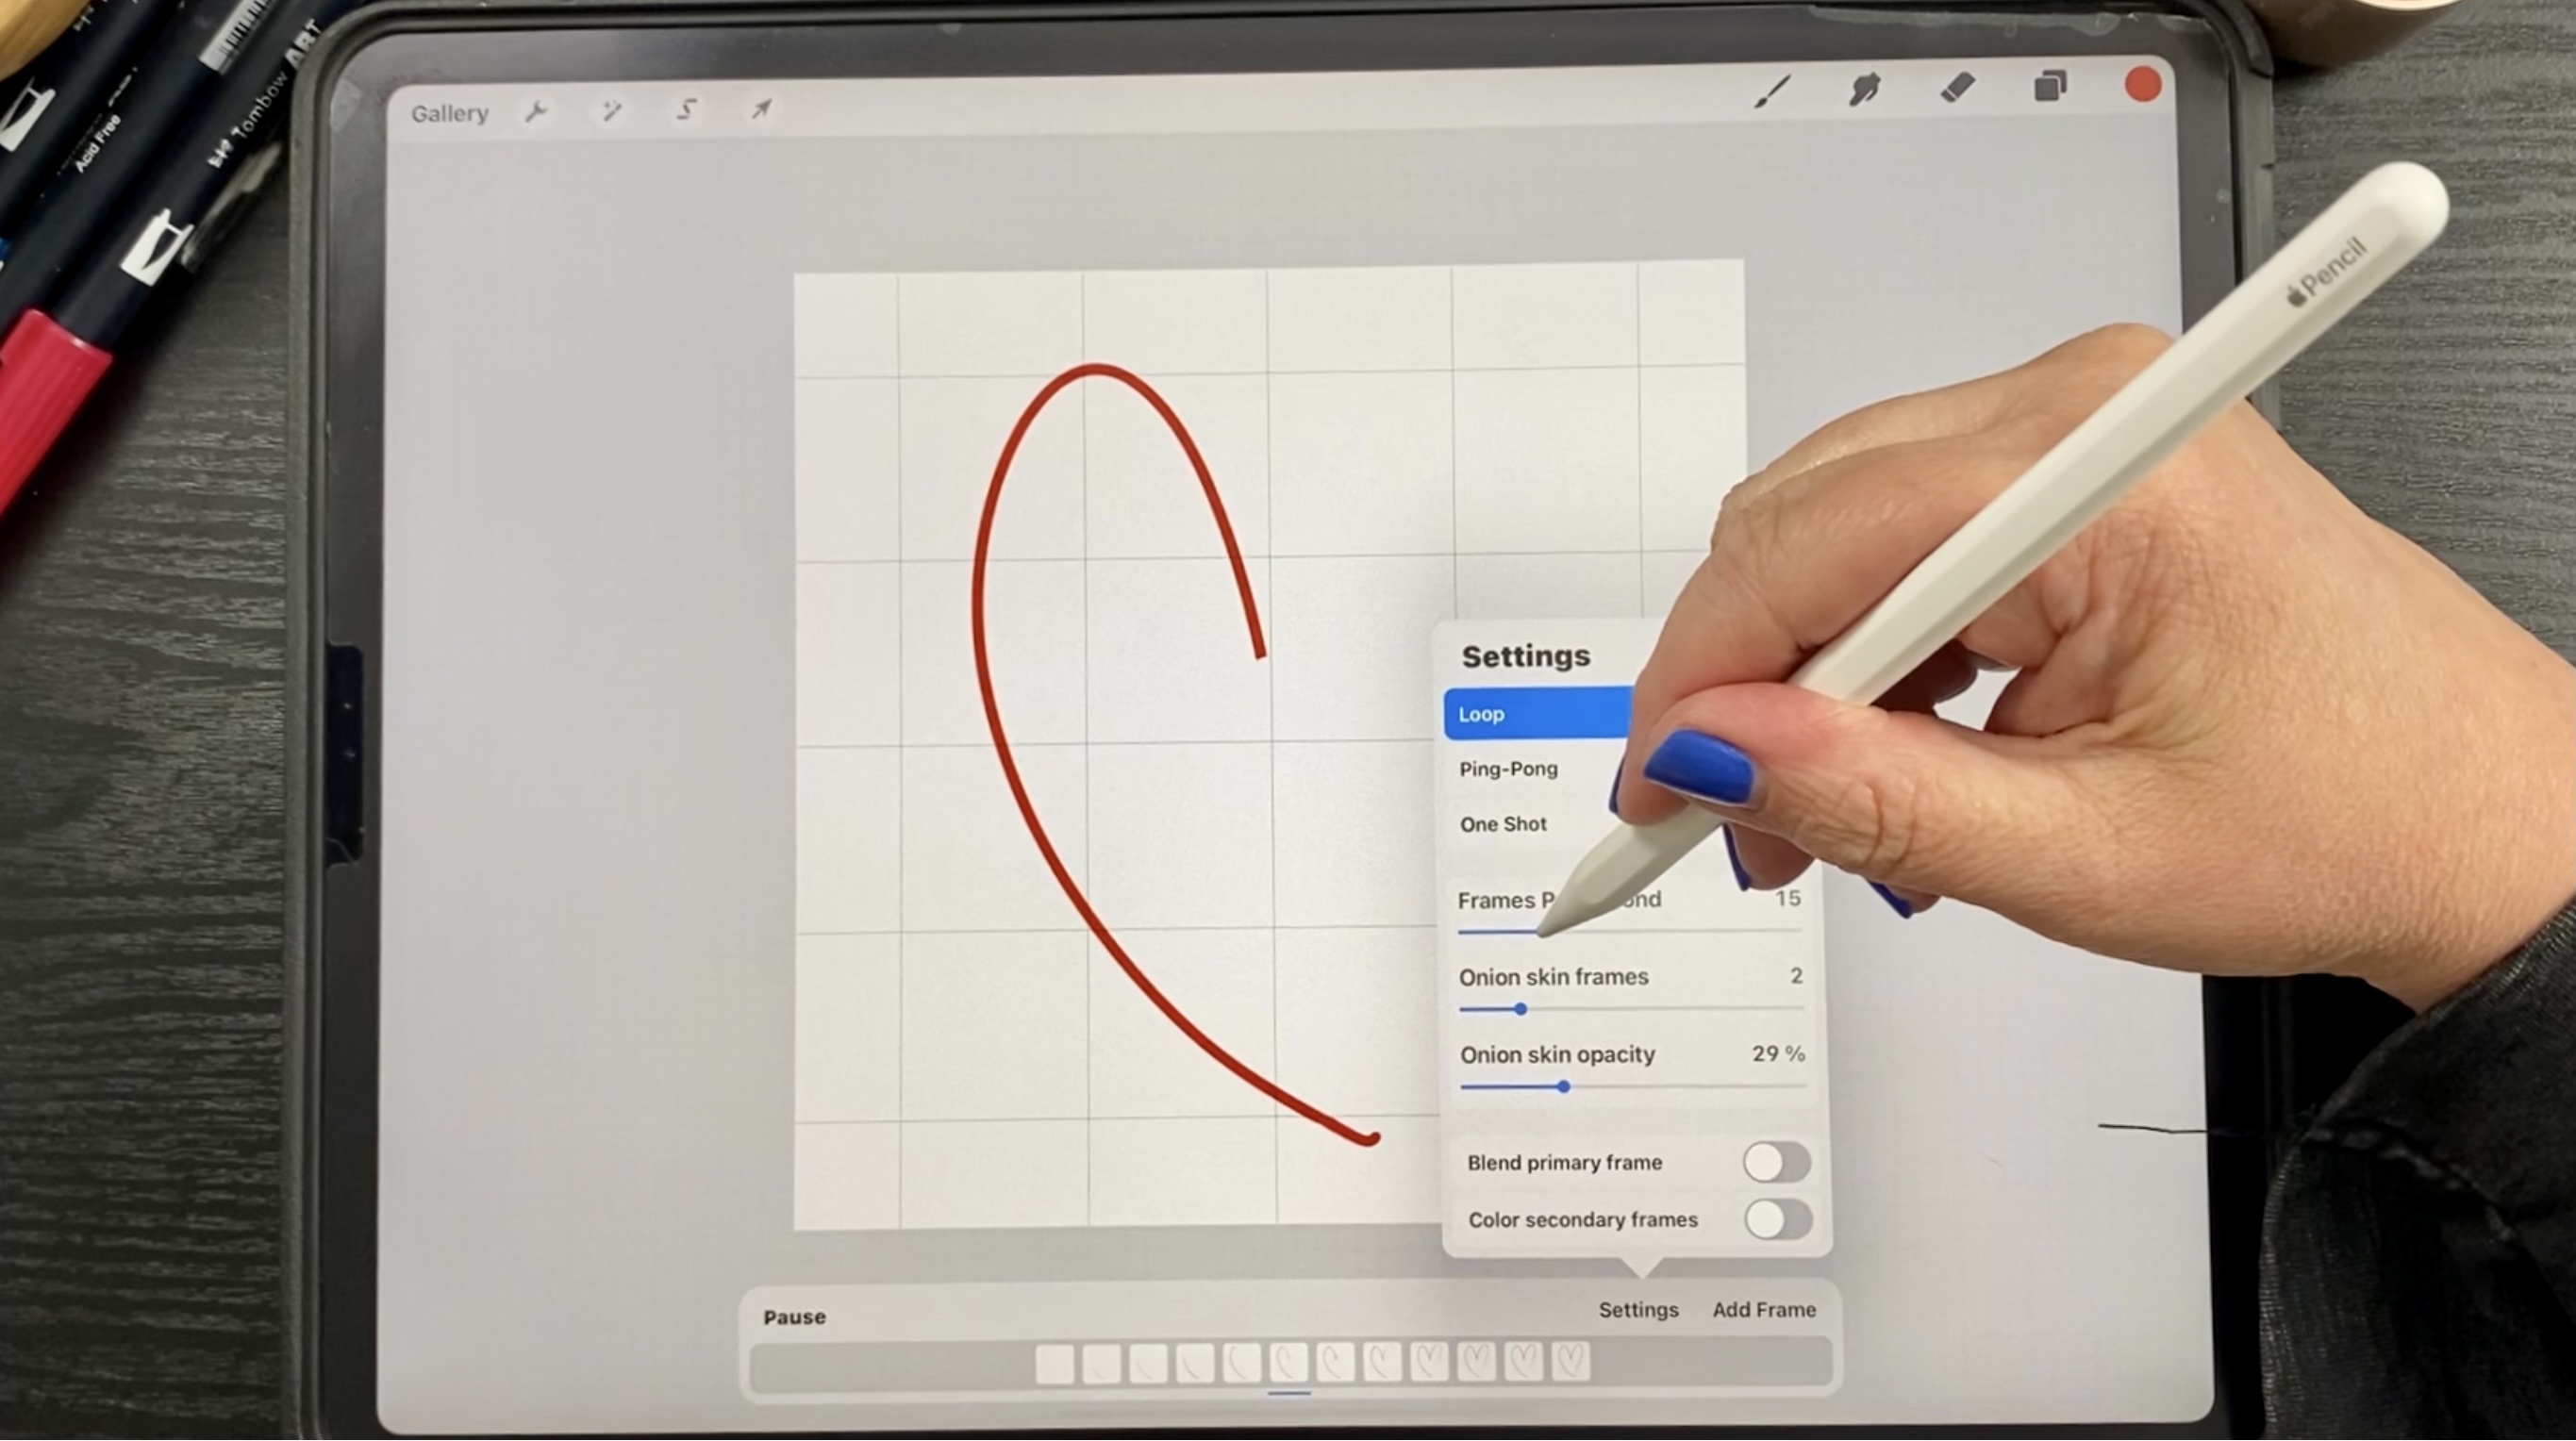
Step 3: Turn on Your Animation Settings
You can find them at the bottom of the page. Set your animation type to Loop, onion skin frame to 2 and onion skin opacity to about 30%.
Now that your canvas is set up, head back to your gallery and duplicate the canvas twice by swiping left on the canvas within the gallery and choosing duplicate. You'll be all ready for three new animations.
TIP: The frames at the bottom in the animation bar are essentially the same thing as the layers on the right side of the canvas:

Let's Make the GIFs!
GIF #1 Hand Drawn Heart
Our first GIF is going to be a hand-drawn heart! Open one of your pre-made canvases.
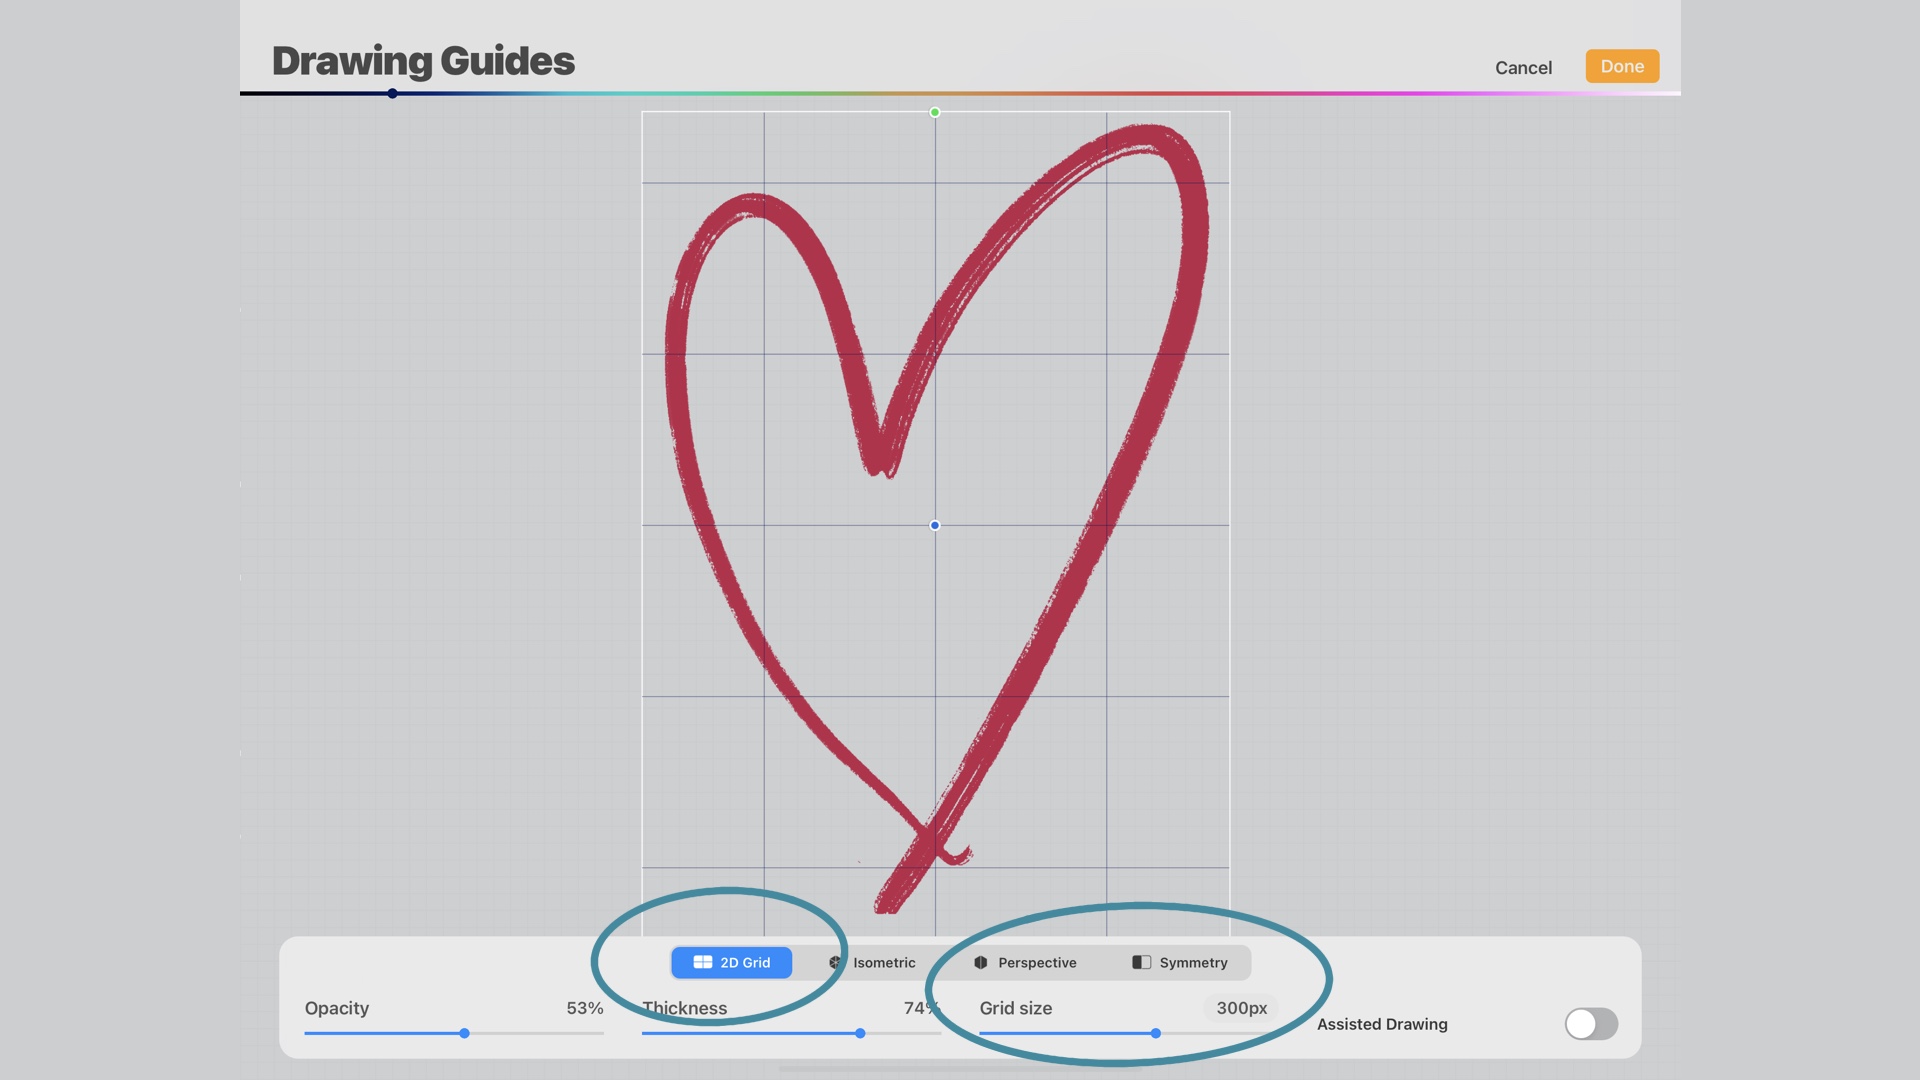
Step 1: Turn on Your Drawing Guide
Add a drawing guide by going to the Wrench icon on the top left and turn on the Drawing Guide: Wrench > Canvas > toggle Drawing Guide on.
Edit the drawing guide at the bottom of the screen to whatever you prefer. I'm doing a 2D grid with a grid size of about 300 pixels.
Step 2: Draw Your Heart
Next, draw a large heart in the middle of the screen.
Step 3: Make a Copy of Your Heart
Duplicate the heart you drew by tapping on the layer, then swipe left and choose duplicate.
Step 4: Erase Portions of the New Layer
Since we want this to look like it's being drawn in the GIF, we want to remove some of the new layer now. Tap the bottom layer to begin erasing away the heart. This is where the Drawing Guide will help you so you erase away roughly the same amount every time, making your animation smoother. In this case, I'm erasing away the equivalent of about one square at a time.
Continue by duplicating the bottom heart frame and erasing away a part of the heart line that's about a square long (or whatever it ended up being in your case!), and keep doing that until your entire heart is gone.
TIP: The most common mistake here is erasing in the same direction you would draw. To draw a heart, I would start the heart at the bottom, pull my pen up and to the left, down to the little heart cleavage area, and then up and to the right and down to meet my first stroke to close the heart. To get the hand-drawing effect for this animation, begin erasing the last stroke you put down, and keep erasing in the opposite direction of the way you drew.
Eventually you will have a screen that looks something like this:

Step 5:Play Your GIF and Make Adjustments
We're ready to play our first animation! Tap Play on the bottom animation bar to watch your animation.
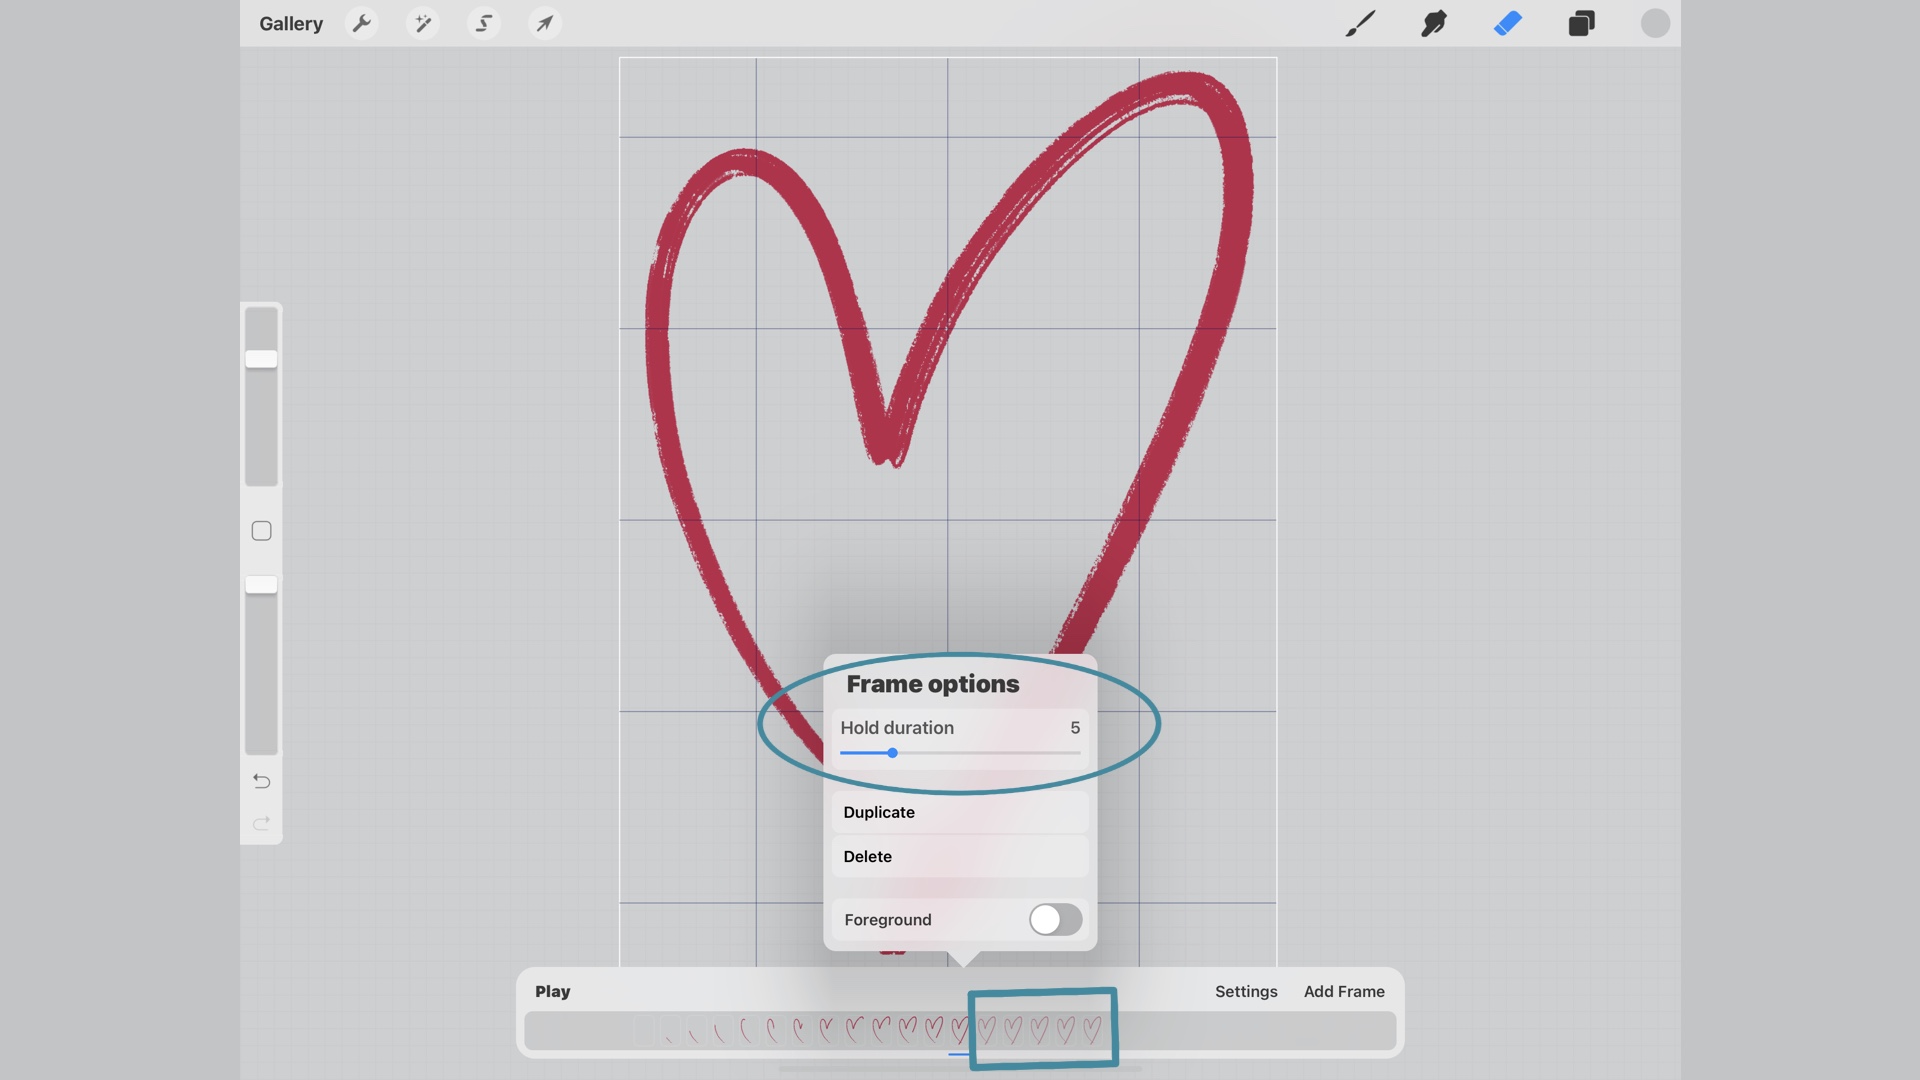
You might want to make a few adjustments. To do that, tap Settings on the bottom animation bar and adjust the speed to your liking. I'm going with 12 frames per second for this one (note: Procreate defaults to 15 frames per second, but most animations work well with a lower amount of frames).
Next, let's put a hold duration on the last frame so we can enjoy the full image before it plays again. To do that, tap on the last frame and a new box will pop up. From there, slide the hold duration over to as many frames as you would like (I'm going with five frames here). You'll be able to see your hold duration in the animation bar as little grayed out duplicates of the frame that's holding.
Hit play again and see how you like it!
Step 6: Export Your Hand Drawn Heart GIF
If you're happy with the outcome, you can go ahead and export your GIF. You'll need to go to the Wrench icon > Share > Animated GIF. Then tap export and choose where to save your GIF. If you choose Save Image, the GIF will go to your camera roll.
Tip: Don't forget that if you want a transparent background for your GIF so remember uncheck Background Color - it's always the bottom layer.

Now let's make MORE GIFS...
GIF #2 Beating Heart
Ready for our second animation? Let's go!
Step 1: Open a Blank Canvas
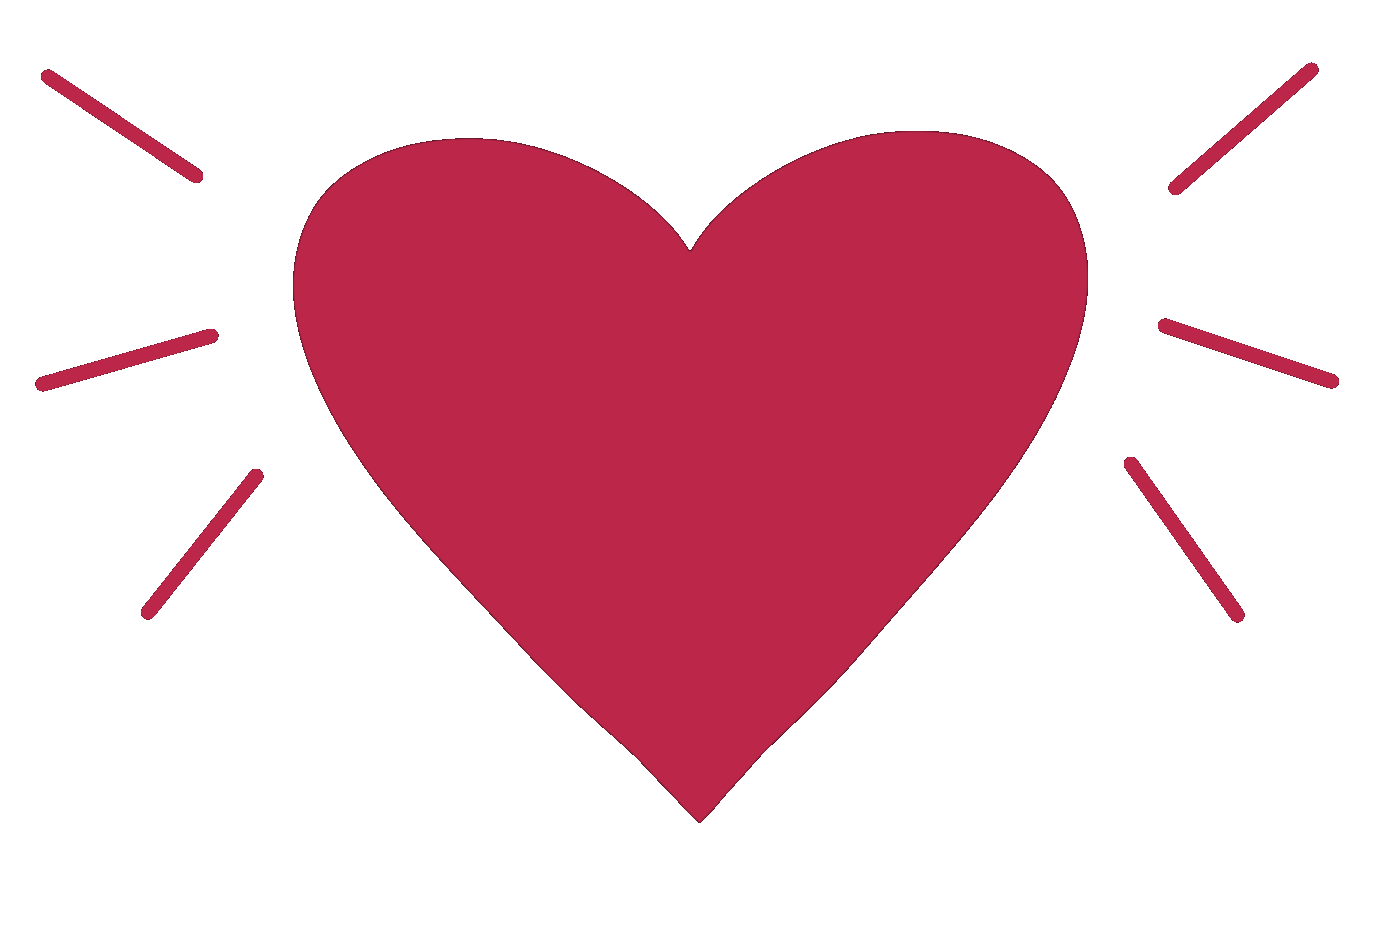
Open one of the blank duplicated animation canvases you created. Use a stamp or draw your own heart and add three little lines on each side. That will help create the beating heart effect.
Step 2: Duplicate
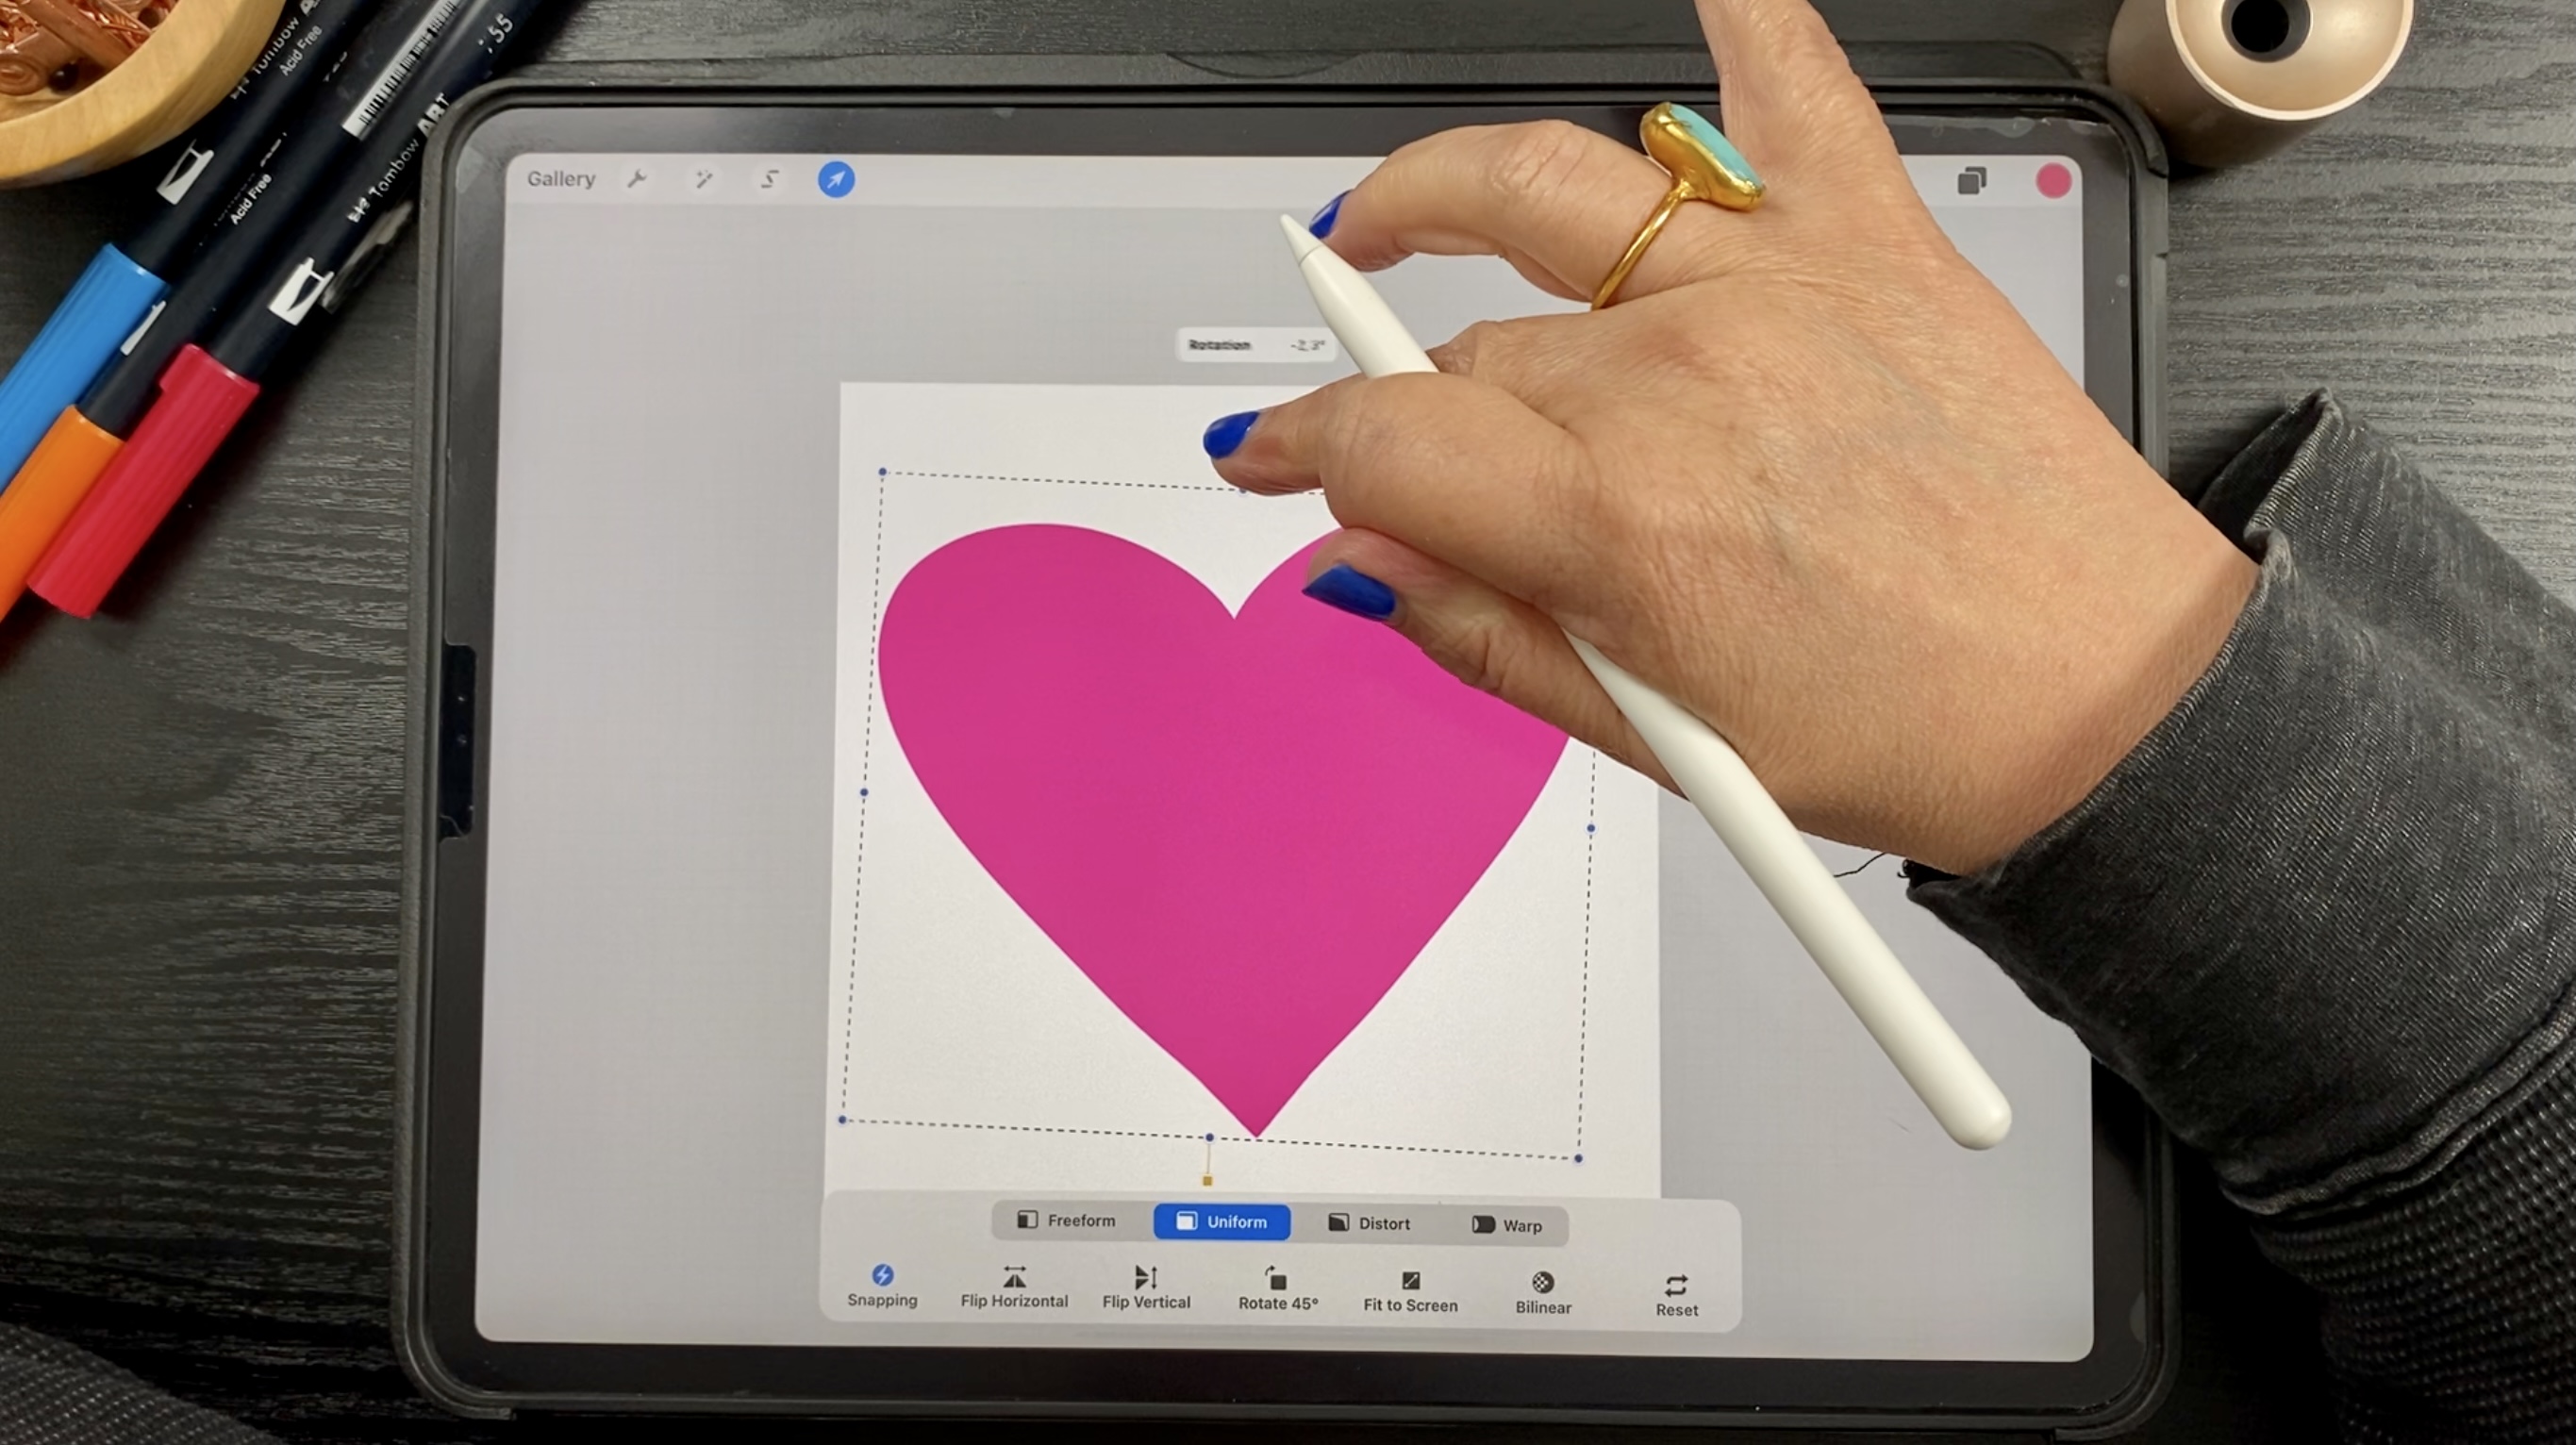
Next, we need some more hearts. Duplicate your heart layer then tap on the bottom heart layer and make it a little smaller. To do this, tap the arrow at the top left of your screen. That will select the image and allow you to drag it to a smaller size.
TIP: Look at the bottom bar and make sure Uniform is selected.
Step 3: Erase
Erase the lines and redraw them on the new, smaller heart layer. Make sure not to trace them exactly, you just want to go over them to get some variation. Having a subtle difference between the lines on each layer will make the lines wiggle a little.

Tap the smaller heart layer, and repeat the steps above until you have four layers of hearts and lines. Each one will be a little smaller than the one above, and each set of lines will be slightly different from the others.
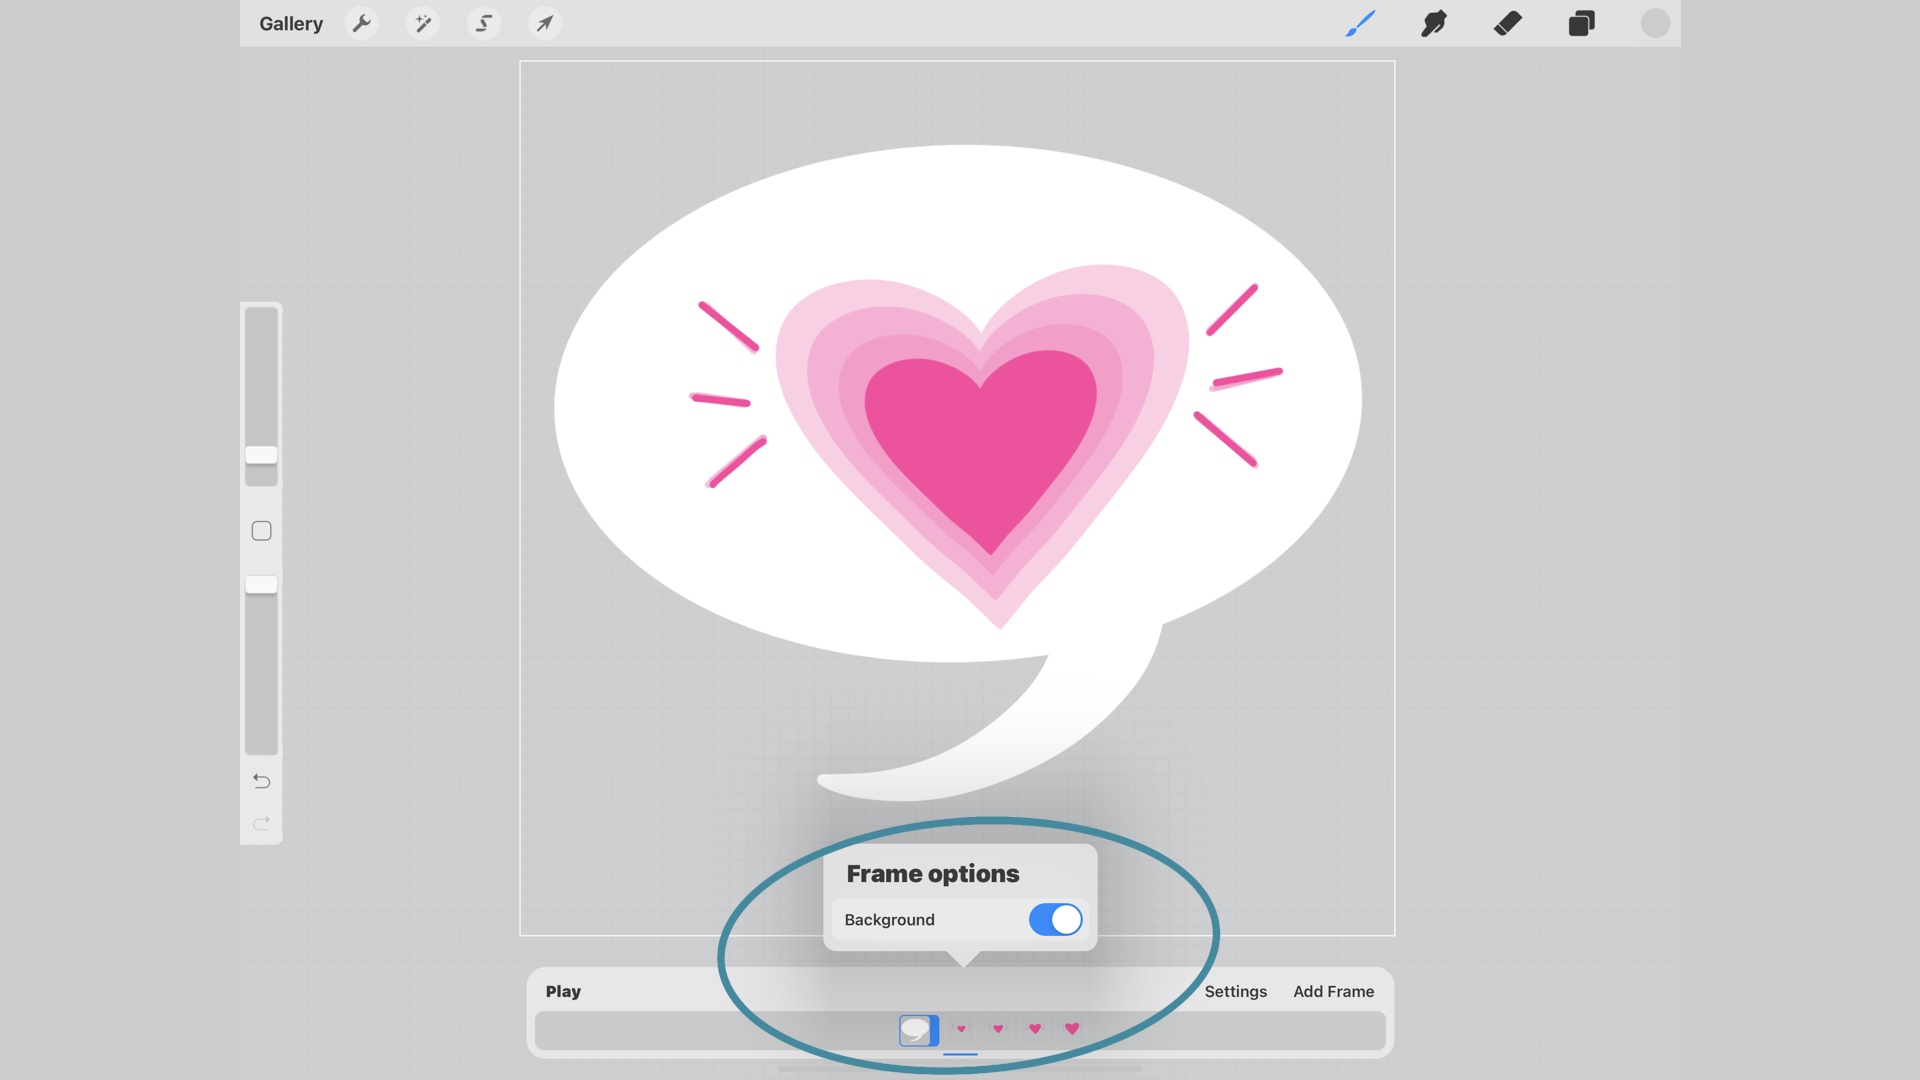
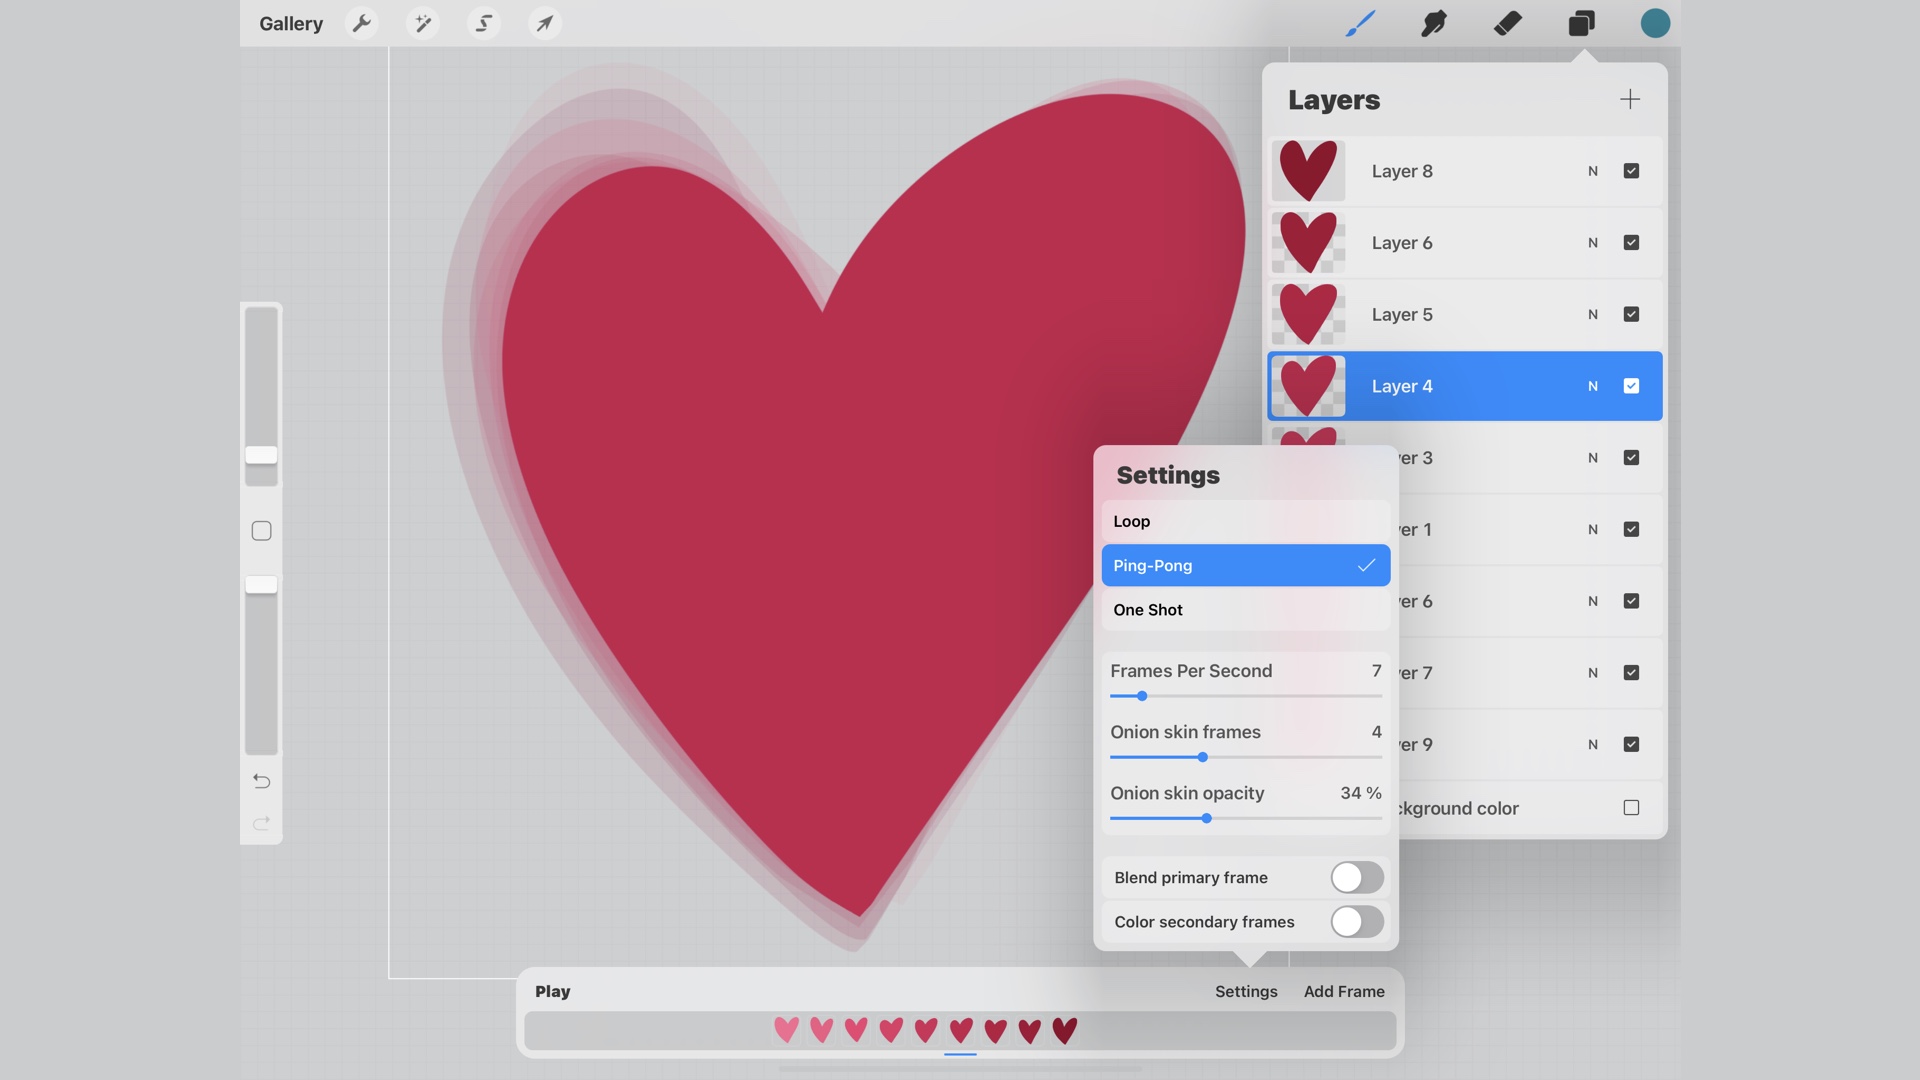
The first animation we created was a loop where the action replays over and over, from start to finish. A ping-pong animation, however, plays from start to finish and then goes backward to the start. So, the heart will go from small to big, and then from big to small, and so on.
Step 4: Change Settings to Ping Pong GIF
To change the animation from Loop to Ping-Pong, tap Settings in the animation bar and select Ping-Pong.

Hit play and enjoy your animation! Adjust the speed to your liking; I have it at 6 frames per second and ended up changing the color in the end - because it's totally fine to change your mind 😉
Want to try more Procreate tricks? Check out how to make your lettering into animated illustrations.
Ready for EVEN MORE Animations?!
GIF #3 Heart in a Bubble
Step 1: Duplicate the Beating Heart Project
This one's really easy! Simply duplicate the last beating heart GIF we created by swiping left on the canvas within the Gallery and tapping Duplicate.
Step 2: Decrease Size
Group the hearts together temporarily by swiping right on all the layers so the layers are blue. This way you can move them as a group without formally grouping them. Tap the arrow at the upper left part of the screen (make sure Uniform is on!) and make them all a bit smaller to accommodate the chat bubble you'll draw on a new layer underneath:
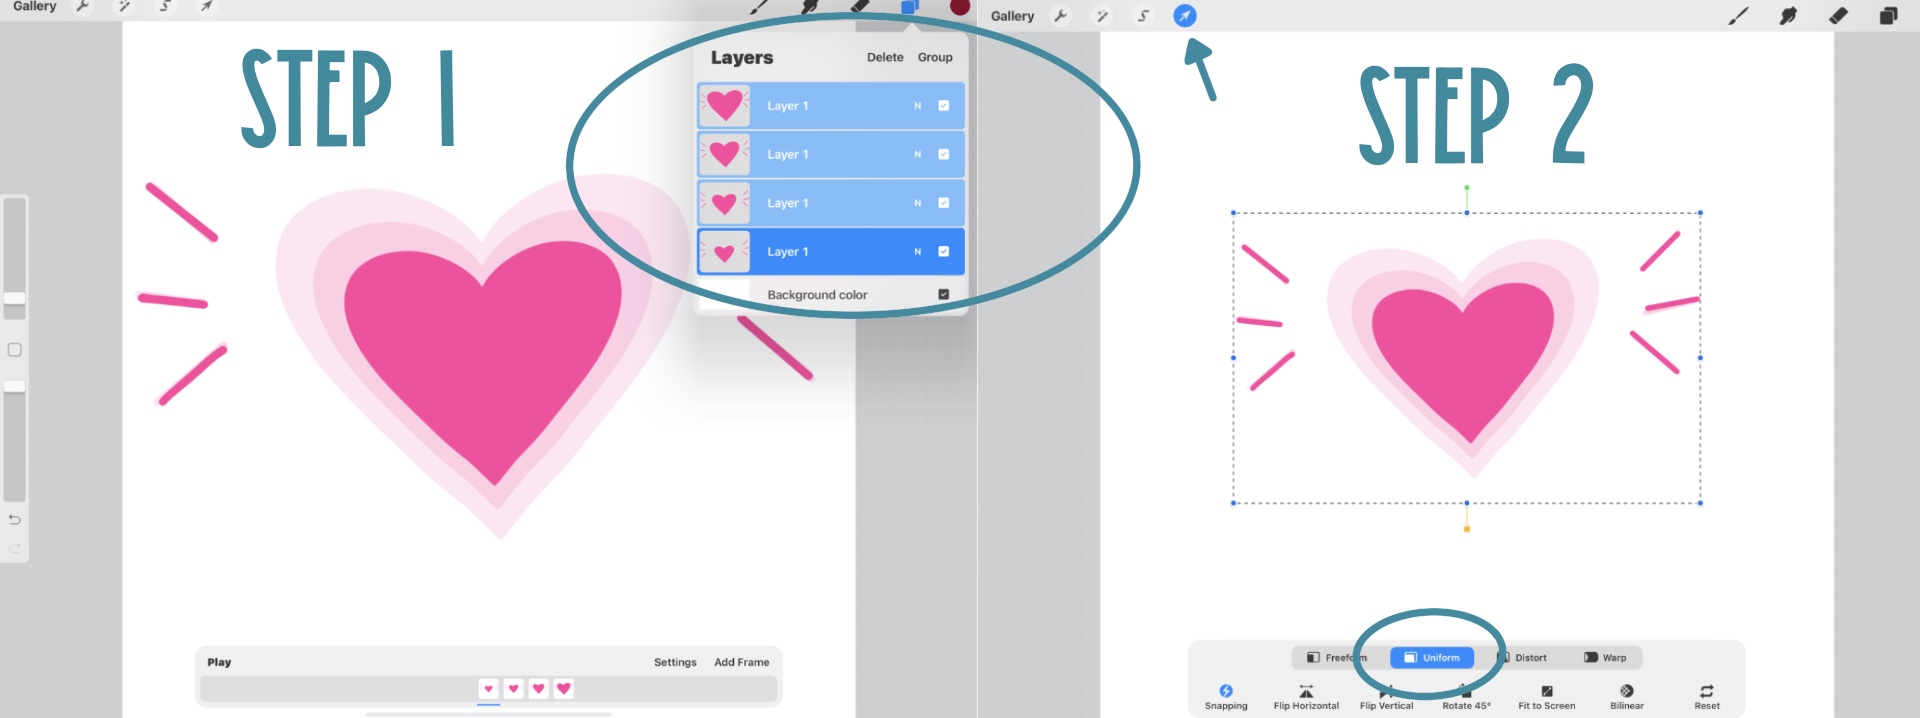
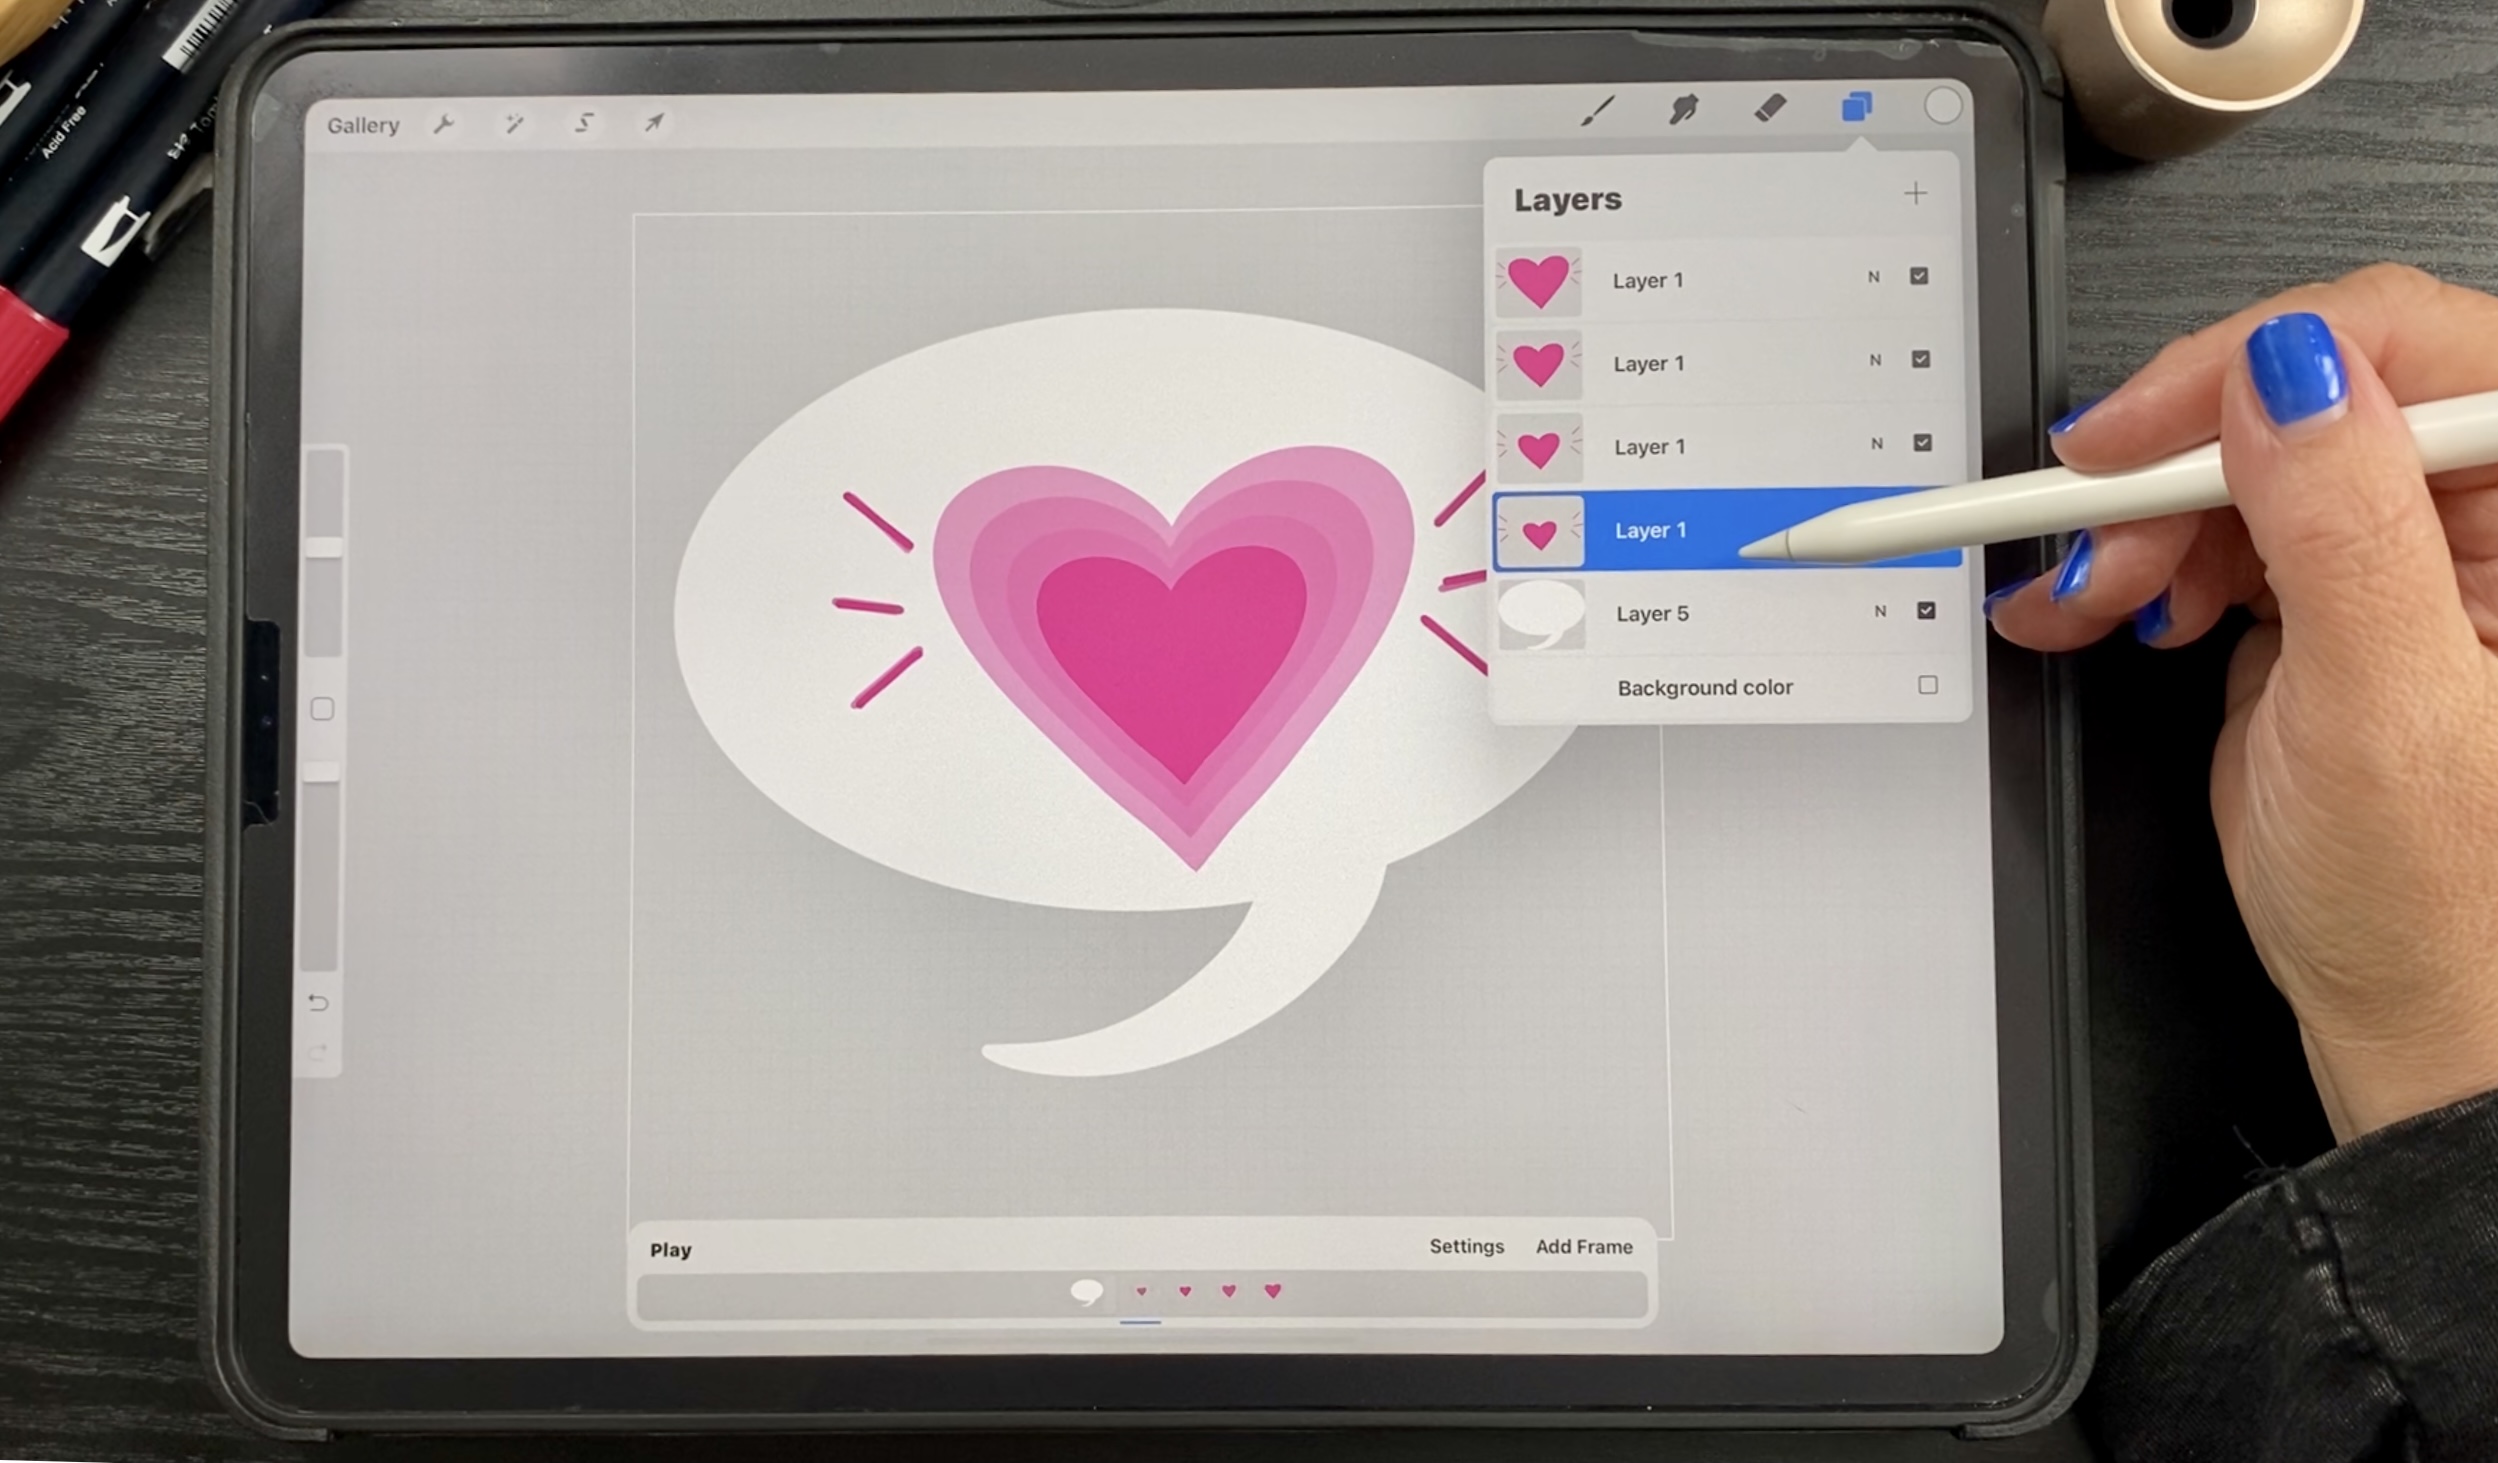
Step 3: Draw a Bubble
Draw a bubble on a layer beneath all of your other layers. Then go to the bottom animation section, select the bubble frame and toggle it on as a background frame. This way, your bubble will hold steady in the background as the heart animation beats on top of the chat bubble. Super easy AND fun, right?
Here's my final result:

Ready for the last animation?
GIF #4 Red Heart Ping-Pong
Step 1: Draw a Heart
Draw a heart ~7-10 times on different layers by tracing the original heart loosely every time you draw a new one. The slight variation in the shape of the hearts will cause the wiggling effect - just like it did with the lines in the other GIF we created today!
When you're done with your heart layers, you'll have a screen that looks like the one below. Mine has nine heart layers and a speed of seven frames per second. I also varied the color on each layer for funsies.
Step 2: Make Adjustments
Play around with yours until it's just how you like it! No right or wrong way here, it's just a matter of preference.
And you're done!

Thanks so much for creating animations with me today, I can't wait to see your results - make sure to tag me on Instagram (@kelleybrenburke).

Hi, I'm Kelley! Most days, you can find me working at our Minneapolis home with our bulldog, Murphy.I'm a self-employed artist with two businesses. I started my first business in 2013, Gems by Kelley, and I specialize in minimalist gemstone bracelets.
My second and newest love is art. I'm a self-taught artist and a Skillshare teacher. After taking lots of Skillshare classes for several years (including many of Peggy's!), I began publishing Skillshare classes in 2020. All of my classes are about creating animated GIFs using the Procreate app. I create art digitally, using my iPad, Apple Pencil and the Procreate app. I'm passionate about pursuing my best life through art, creativity, and entrepreneurship, and I want to help others do the same.


Kelley is a self-taught illustrator, animator, doodler and educator. She creates art on her iPad with Procreate and is excited to share her love of the illustration app with artists of all levels. Check out more of Kelley's tutorials here.
Don't have an iPad handy? No problem, pin this blog for later.

Source: https://www.thepigeonletters.com/blog/make-GIFs-in-procreate
0 Response to "Funny Im With You Always Gifs"
Post a Comment